

First steps toward Python 3 compatibility
1. Every new bit of code has to be compatible with Python 3
Even if you just started thinking about migrating to Python 3, there is one policy you should introduce into your code development right away: every new bit of code committed to your repository needs to be Python 3, at least in theory. It’s a “best effort” type of deal here.
If your product is under active development, following that principle alone will make the actual migration much smoother. It’s also super cheap.
There’s no need to modify your continuous integration pipeline, nice as it would be. Delaying the introduction of the rule just because you don’t have the capacity to implement changes to the pipeline at the moment makes no sense.
You’re probably busy with introducing new features as it is. By making all your new code Python 3-compatible, you’ll already be migrating without dedicating development time solely to it.
It really is the perfect place to start.
2. Quality assurance tools are your friends
Good test coverage, linters, and other tools run under your continuous integration systems are lifesavers whenever you introduce far-reaching changes to your application.
If you aren’t using any of these, we highly recommend you consider it.
Here are several quality assurance tools that can be immensely helpful when porting to Python 3:
a) Linters
Linters are the easiest to introduce, but that doesn’t mean they have little value. They will provide a welcome boost to your migration efforts.
b) Tests
Tests are pretty essential and unfortunately require a certain time investment, especially at the start, but they’re well worth it. For a sizable application, even the most basic happy path tests will save you countless hours you would otherwise spend on laborious manual testing and fighting regressions.
c) Continuous integration
Continuous integration brings all your software development efforts together in an automated manner. Once again, this is a time-saving measure, especially important if more than one person works on your product.
d) Error tracking
Error tracking is yet another tool that can prove really helpful should something slip through the cracks of pre-production testing.
As an example, Sentry provides you with a comprehensive error report in case of failure. This includes stack trace, which allows you to fix common transition-related bugs in a matter of minutes.
These quality assurance tools aren’t strictly required for migrating to Python 3. However, it will be much harder to ensure your software keeps running smoothly without them. Introducing QA tools will also improve your standard development workflow.
All in all, the faster you implement the tools, the better for you.
3. Safe compatibility fixes
To kickstart your efforts, use automatic code conversion.
For this purpose, we suggest using python-modernize, which is built on top of the 2to3 tool and the popular six package.
Here’s what you should do, step by step:
- Add a new “six” dependency to your application dependencies.
- Run “pip install modernize.”
- Run “python-modernize -w” in your project directory.
- Review the changes. They should be reasonably safe, but sometimes visibly inefficient—adjust them as you see fit.
- Test your app on Python 2.
If all goes well, you should have relatively safe compatibility fixes already applied to your code base. You can use them as a point of reference when adding new code until you fully switch to Python 3.
4. Updating dependencies, part one: the easy wins
Your application is already on the way to reach full Python 3 compatibility, but the issue of its dependencies still remains.
It’s not uncommon for projects to accumulate dependencies that are no longer maintained and consequently lack Python 3 support.
In some cases, all you’ll need to do is update a dependency to a newer version; in others, you’ll have to make sure the update is the latest version, compatible with both Python 2 and 3. That’s because certain packages may have already dropped Python 2.
Regardless, at this point, it’s best to concentrate on the easy wins.
Most of your packages are likely already compatible or only require an update to a newer version. As a rule of thumb, we suggest updating to the latest release of each dependency to be on the safe side.
Checking each dependency one by one can be time-consuming in larger projects. You can facilitate the process by running “caniusepython3” on your “requirements.txt” (create one with “pip freeze > requirements.txt” if you don’t have one).
This tool is far from accurate, but it’s good enough to achieve our main goal here: assessing how much work remains before you can make the final switch to Python 3.
Python 3-compatible forks
It isn’t unusual to learn that a package has been completely abandoned by its original authors. However, it’s still a good idea to browse through the package’s GitHub repository issue tracker or PyPI index, since others have likely encountered the same issue as you and already created a fork compatible with Python 3.
If you’re unable to identify a working Python 3 package replacement, postpone upgrading or replacing it to a later stage. You have bigger fish to fry.
Dealing with backports
Some of the features added to Python 3 have been backported as separate installable packages. Popular examples of this include “subprocess32” and “functools32.”
These backports tend to be incompatible with Python 3 and will fail if you even attempt to install them. You can use environment markers to make sure that doesn’t happen.
Here’s how you can carry out a conditional installation of “functools32,” only on Python 2:
functools32; python_version < "3"
This syntax can be applied to both “requirements.txt” and “setup.py.”
When it comes to the code, use a “try-except” syntax for such packages:
1 2 3 4 try:
from functools import lru_cache
except ImportError:
from functools32 import lru_cache
5. Python 3 compatibility linting
Once you’ve put all of our suggested fixes into practice, you and your team should already be familiar with writing code that will run on Python 3 as well as it does on Python 2.
That being said, we strongly advise that you use code linters to support you in this task.
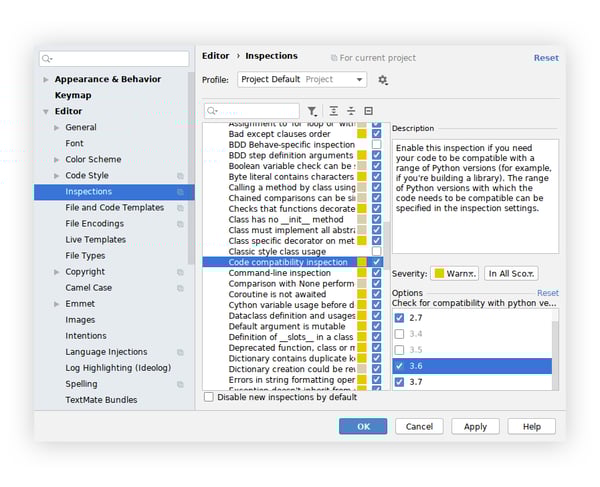
PyCharm code inspection
PyCharm started supporting compatibility static analysis 8 years ago. If you’re a PyCharm user working with Python 2 codebases, make sure you have the feature enabled.
But if you’re not using PyCharm, this feature alone is a good enough reason to switch.
pylint --py3k
Pylint is known to be quite verbose and sometimes overzealous, but it still is an excellent tool for locating small issues before they turn into big problems.
Install “pylint” and run “pylint --py3k application/*” to get a report of possible issues in the code. Remember to examine at least each unique message.
In the process, you might learn a thing or two about the changes and new features introduced in Python 3, which is valuable in and of itself.
Python 2 to 3 migration cheat sheet for pylint
Here’s a quick cheat sheet of the most common pylint messages and fixes.
We left out frequent errors that can automatically be fixed with “python-modernize.”
1. long-suffix (E1606); long-builtin (W1608)
Using the long suffix; long built-in referenced
1 2 3 # Python 2
123L
long(123)
1 2 3 4 5 6 7 8 9 10 11 # Python 3
123
# or if you indeed need the long type when using Python 2
try:
long
except NameError:
long = int
long(123)
2. exception-message-attribute (W1645)
Exception message removed in Python 3
1 2 # Python 2
exception.message
1 2 # Python 3
exception.args[0]
3. using-cmp-argument (W1640)
Using the cmp argument for list.sort/sorted
1 2 # Python 2
sorted(iterable, cmp=cmp_func)
1 2 # Python 3
sorted(iterable, key=functools.cmp_to_key(cmp_func))
4. cmp-builtin (W1604)
Cmp built-in referenced
1 2 # Python 2
cmp
1 2 3 4 # Python 3
# use key function if possible, otherwise usedef cmp(x, y):
return (y > x) - (y < x)
5. old-division (W1619)
Division w/o __future__ statement
1 2 # Python 2
1 / 3 == 0 # True
1 2 3 4 5 # Python 3
from __future__ import division
1 // 3 == 0 # True
1 / 3 == 0.3333333333333333 # True
6. stop-iteration-return (R1708)
Do not raise StopIteration in the generator; use the return statement instead
1 2 3 4 5 # Python 2
def gen():
yield 1
raise StopIteration()
yield 2
1 2 3 4 5
# Python 3
def gen():
   yield 1
   return
   yield 2
Running Python 3
1. Updating dependencies, part two: finishing the job
After some time has passed, you’re welcome to once more look for Python 3-compatible alternatives to your dependencies that you weren’t able to find before.
If you still come up empty, you’d be wise to consider whether you want to be stuck with an unsupported and unmaintained package. And if removing it from your codebase would take up too much of your time—fork it and apply the exact same process. In the case of most packages, a single run of “python-modernize” might very well fix the issue.
Once you’re done, either publish your fork on PyPI for others to benefit from or directly install it from the repository and use it that way. Just make sure to credit the author and remember to include the original license, since it’s required by most open-source licenses.
2. Last steps in your Python 3 migration
At this stage, you’re very close to being 100% Python 3 ready. However, there are still several steps left to help you avoid potential problems during production deployment.
a) Continuous integration
If you are not doing already start running your app under Python 3 parallel to Python 2 in your continuous integration environment. Even if the tests start failing, it will be helpful in measuring your progress and preventing regressions.
If you don’t have full-fledged continuous integration, consider using tox for local testing under multiple versions of Python.
b) Cache and shared application state
Remember to flush your cache right before deployment. With such a significant change, an application state that is anything other than blank will make debugging significantly more cumbersome.
This is especially true for objects pickled using the “pickle” module under Python 2; they won’t be compatible with Python 3, so be sure to remove or recreate them before deployment. Otherwise, your app may fail outright, even if it was working just fine during testing on a clean test environment.
c) Manual regression tests
No matter how comprehensive your tests are, you can always miss some things, like differences in the configuration or the processed data. To make sure that’s not the case, a final manual check for regressions is a must before you begin production deployment.
Beside happy paths, which are the most important, remember to test what is most often missed, but may become a real problem during production setup. Your application needs to work correctly with:
- the WSGI production server (as opposed to the built-in server in development mode);
- emails and other external means of communication that may have been mocked in the dev/test setup;
- production-like data as well as an empty database.
3. Gradual deployment or a leap of faith
Depending on a number of factors, such as the resources available or your service-level agreement, you should consider gradual deployment.
If your service is load-balanced across multiple server instances, it may be a good idea to launch Python 3 on only one of them, then start increasing the role of Python 3 as your confidence in the migration grows.
This is the safest option, but it does require additional work, especially since some artefacts, such as the aforementioned cache, have to be kept separate in Python 2 and Python 3 instances.
Or... you could just go for it and deploy the whole thing at once!
Either way, some minor bugs are bound to appear, so be prepared to respond to them quickly. An error aggregation tool or sound logging management should allow you to solve them at the first sign of trouble in no time at all.
Final thoughts
If you want to speed up your Python 3 migration, it helps to have someone with experience in both Python 2 and 3 codebases.
Even though a substantial part of the process is automated, it’s still far from perfect. What’s worse, steps such as updating or even swapping some of the dependencies can’t be done without high working knowledge of them.
For that reason, when it comes to larger applications, we suggest hiring outside specialists if you don’t currently have the right people for the job in-house.


