

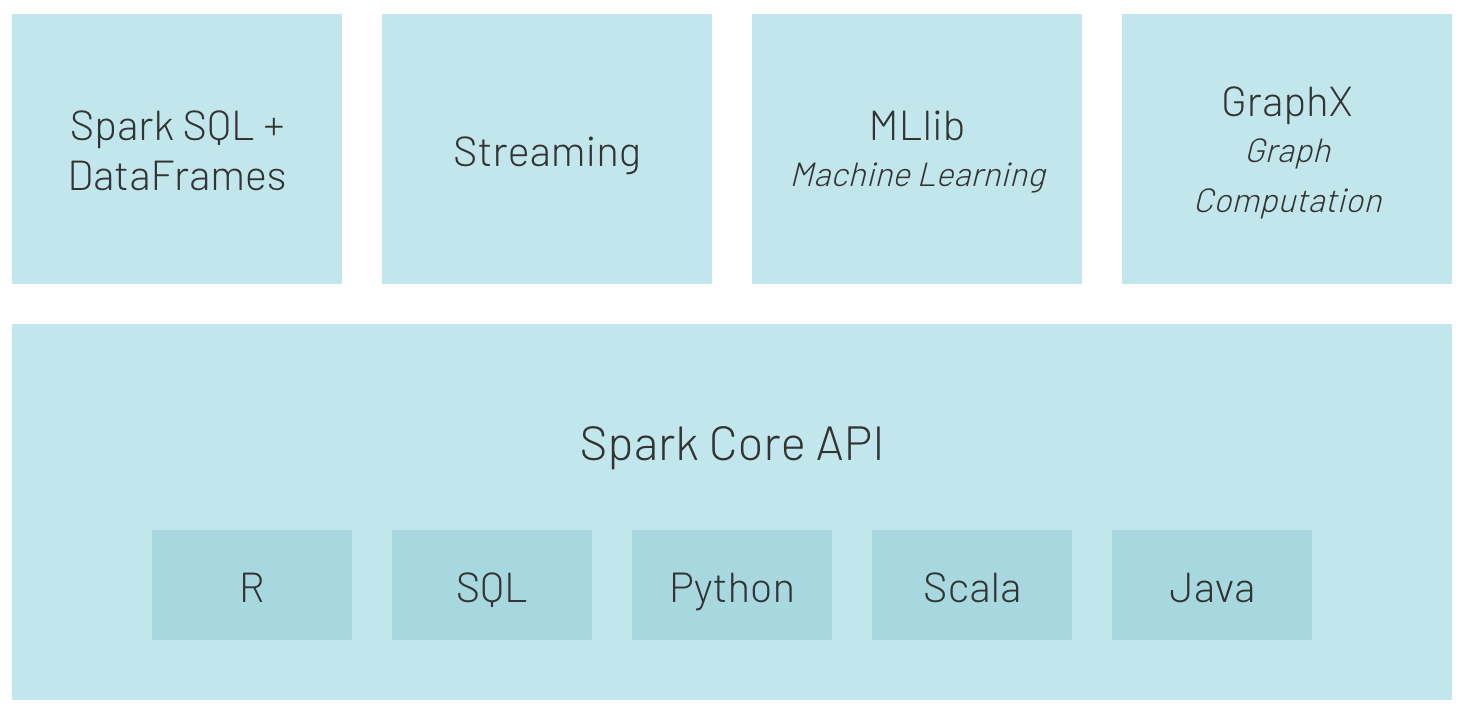
What is Apache Spark? Why should you use it?
Apache Spark is an analytics engine used to process petabytes of data in a parallel manner.
Thanks to simple-to-use APIs and structures such as RDD, data set, data frame with a rich collection of operators, as well as the support for languages like Python, Scala, R, Java, and SQL, it’s become a preferred tool for data engineers.
Due to its speed (it’s up to 100 times faster than Hadoop MapReduce) and its flexibility (e.g. support for SQL queries, machine learning, streaming, and graph processing) Apache Spark is deployed at a mass scale by enterprises across a wide range of industries.
Source: https://databricks.com/spark/about
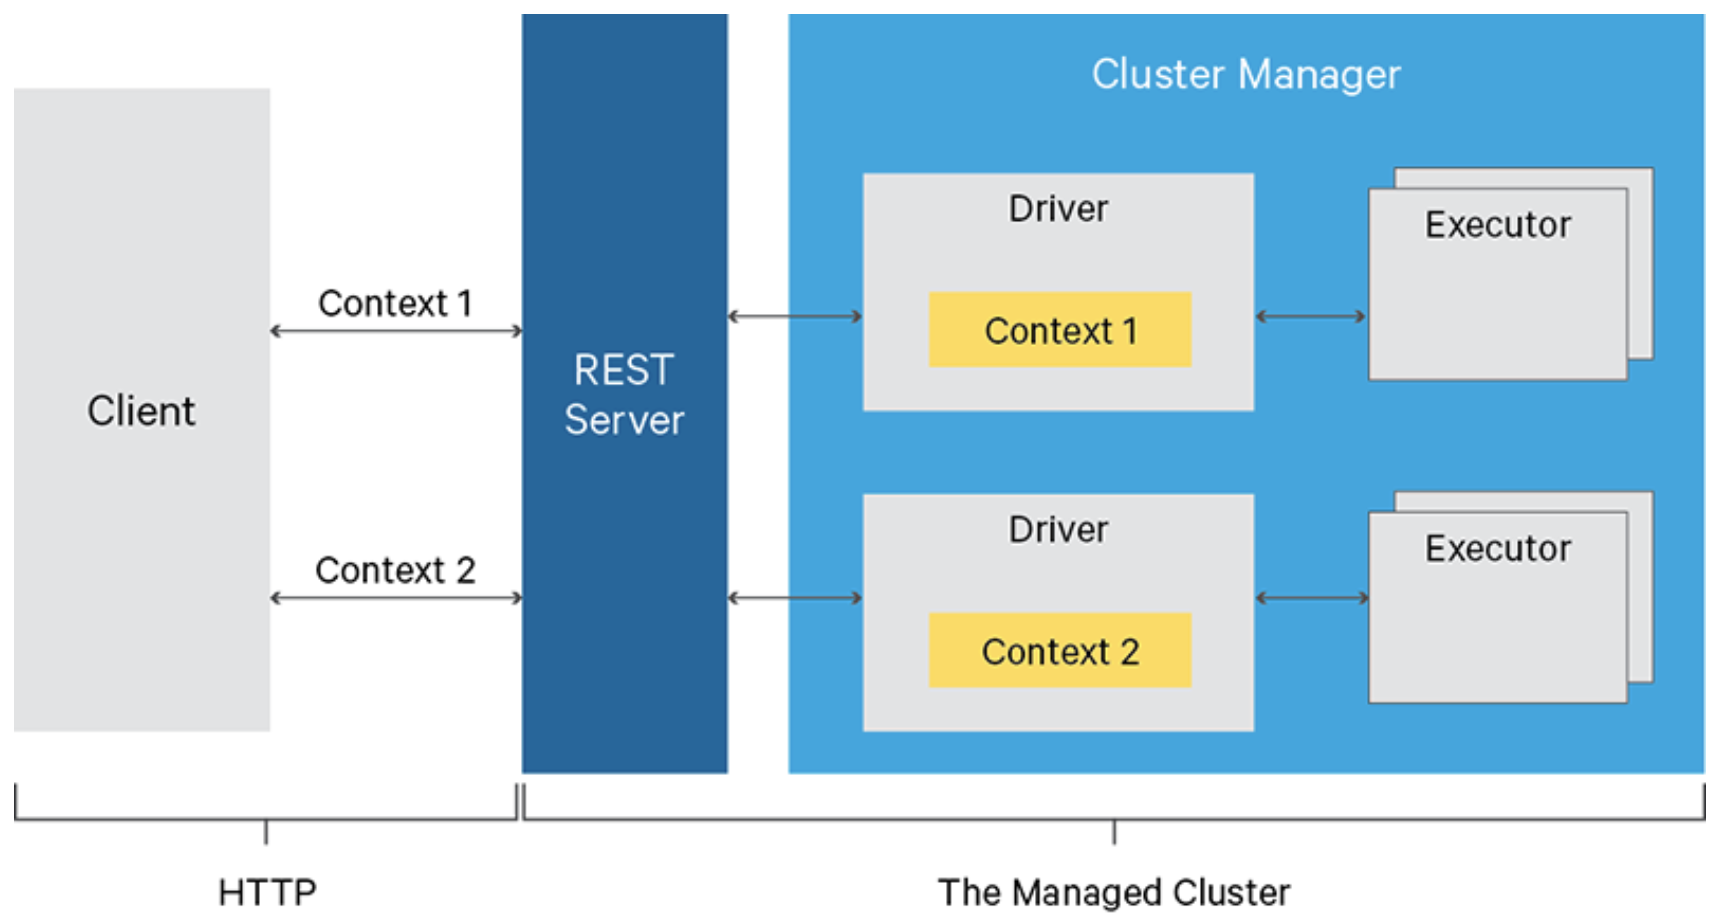
What is Apache Livy? How does it benefit your project?
Apache Livy is a service that enables easy interaction with a Spark cluster over REST API.
Some of its helpful features include:
- submitting jobs as precompiled jars or snippets of code in Python/Scala/R,
- running Spark jobs synchronously or asynchronously,
- managing multiple SparkContexts simultaneously,
- long-running SparkContext can be reused by many Spark jobs,
- share cached RDDs or data frames across multiple jobs and clients,
- secure authenticated communication.
You might be wondering how to make Apache Spark simpler to use in automated processing.
For example, we can imagine a situation where we submit Spark code written in Python or Scala into a cluster, just like we submit SQL queries into a database engine. If we don’t want to play with the command line to reach the cluster directly using SSH then Apache Livy comes into play with its REST API interface.
Do you have to create an additional layer of logic to manage connections and all REST API functionalities?
No, thankfully there’s a dedicated library called pylivy that I’m going to use in the sample project. You can find pylivy examples and documentation here.
Testing the concept of using Apache Livy in Spark clusters
Let’s assume that we have to create an application to process some customer or market data on Spark and our app will run on a daily basis.
From a developer’s point of view, we first have to prepare scripts with the business logic. Next, we should prepare the jobs’ controllers to manage communication with our Spark cluster via the Livy REST API.
But before we develop anything, we need to install and configure Livy and the Spark cluster.
Setup requirements
As I mentioned at the beginning of this article, to keep the operating system free from dependencies, we use the Docker container service to run our infrastructure. So, first, we need to prepare Docker files for the Spark master and worker containers with a separate container for JupyterLab.
Installation and service configuration
If you don’t have the Docker service installed, follow these instructions to get it running on your machine.
If you’re here, I assume you have Docker ready to run our containers, so we can focus on the code.
To keep our concept more realistic, I decided to split infrastructure into three separate services:
- jupyterlab,
- spark-master,
- spark-worker-1.
Also, to keep the logic simple and clear, I’ve created a dedicated folder for Docker services called livy_poc_docker.
In the first step, we will create a base image.
The base image uses Debian Linux and contains all required libraries: python3, open-jdk-8 and utilities e.g. wget, curl and unzip.
FROM debian:stretch
# System packages
RUN apt-get clean && apt-get update -y && \
apt-get install -y python3 python3-pip curl wget unzip procps openjdk-8-jdk && \
ln -s /usr/bin/python3 /usr/bin/python && \
rm -rf /var/lib/apt/lists/*
To simplify image structure, I decided to add Spark installation into the base image. For production use, Spark should be added to a separate image.
# Install Spark
RUN curl https://apache.mirrors.tworzy.net/spark/spark-2.4.7/spark-2.4.7-bin-hadoop2.7.tgz -o spark.tgz && \
tar -xf spark.tgz && \
mv spark-2.4.7-bin-hadoop2.7 /usr/bin/ && \
mkdir /usr/bin/spark-2.4.7-bin-hadoop2.7/logs && \
rm spark.tgz
Next, I created the required directories and set up environment variables.
# Prepare dirs
RUN mkdir -p /tmp/logs/ && chmod a+w /tmp/logs/ && mkdir /app && chmod a+rwx /app && mkdir /data && chmod a+rwx /data
ENV JAVA_HOME=/usr
ENV SPARK_HOME=/usr/bin/spark-2.4.7-bin-hadoop2.7
ENV PATH=$SPARK_HOME:$PATH:/bin:$JAVA_HOME/bin:$JAVA_HOME/jre/bin
ENV SPARK_MASTER_HOST spark-master
ENV SPARK_MASTER_PORT 7077
ENV PYSPARK_PYTHON=/usr/bin/python
ENV PYTHONPATH=$SPARK_HOME/python:$PYTHONPATH
ENV APP=/app
ENV SHARED_WORKSPACE=/opt/workspace
RUN mkdir -p ${SHARED_WORKSPACE}
VOLUME ${SHARED_WORKSPACE}
Then, I created an image for the Spark master container.
The Spark master container is responsible for hosting Spark master node and the Livy service.
This image is based on a previously created image called mk-spark-base.
Additional packages for Python will be installed in this step.
FROM mk-spark-base
# Python packages
RUN pip3 install wget requests datawrangler
And, of course, we can’t forget about Apache Livy.
# Get Livy
RUN wget https://apache.mirrors.tworzy.net/incubator/livy/0.7.0-incubating/apache-livy-0.7.0-incubating-bin.zip -O livy.zip && \
unzip livy.zip -d /usr/bin/
Spark master will be the final image we have to expose ports and set up the entry point.
EXPOSE 8080 7077 8998 8888
WORKDIR ${APP}
ADD entryfile.sh entryfile.sh
ENTRYPOINT ["sh", "entryfile.sh"]
Okay, the configuration for the master image is ready. Now, we need a worker image.
It’s only responsible for running Spark node in a worker mode, and nothing else.
This image also uses the mk-spark-base image as a base.
FROM mk-spark-base
ENV APP=/app
ENV JAVA_HOME=/usr
ENV SPARK_HOME=/usr/bin/spark-2.4.7-bin-hadoop2.7
ENV PATH=$SPARK_HOME:$PATH:/bin:$JAVA_HOME/bin:$JAVA_HOME/jre/bin
ENV PYSPARK_PYTHON=/usr/bin/python
ENV PYTHONPATH=$SPARK_HOME/python:$PYTHONPATH
EXPOSE 8081 7077 8998 8888
WORKDIR ${APP}
CMD /usr/bin/spark-2.4.7-bin-hadoop2.7/bin/spark-class org.apache.spark.deploy.worker.Worker spark://${SPARK_MASTER_HOST}:${SPARK_MASTER_PORT} >> /tmp/logs/spark-worker.out
Now, it’s time to create a configuration for the JupyterLab image. Let’s call it mk-jupyter.
FROM mk-spark-base
# Python packages
RUN pip3 install wget requests pandas numpy datawrangler findspark jupyterlab pyspark==2.4.7
EXPOSE 8888
WORKDIR ${SHARED_WORKSPACE}
CMD jupyter lab --ip=0.0.0.0 --port=8888 --no-browser --allow-root --NotebookApp.token=
How simple is that?
Finally, we have the configuration for all containers of our cluster, and it’s time to build images. This simple script runs the `docker build` command to create all required images.
# Builds images
docker build \
-f base.Dockerfile \
-t mk-spark-base .
docker build \
-f master.Dockerfile \
-t mk-spark-master .
docker build \
-f worker.Dockerfile \
-t mk-spark-worker .
docker build \
-f jupyter.Dockerfile \
-t mk-jupyter .
Let’s run it in the CLI: `sh build.sh`.
To start the already built containers, we have to prepare a Docker compose file.
version: "3.6"
volumes:
shared-workspace:
name: "hadoop-distributed-file-system"
driver: local
services:
jupyterlab:
image: mk-jupyter
container_name: mk-jupyter
ports:
- 8888:8888
volumes:
- shared-workspace:/opt/workspace
spark-master:
image: mk-spark-master
container_name: mk-spark-master
ports:
- 8080:8080
- 7077:7077
- 8998:8998
volumes:
- shared-workspace:/opt/workspace
spark-worker-1:
image: mk-spark-worker
container_name: mk-spark-worker-1
environment:
- SPARK_WORKER_CORES=1
- SPARK_WORKER_MEMORY=512m
ports:
- 8081:8081
volumes:
- shared-workspace:/opt/workspace
depends_on:
- spark-master
The Docker compose file is responsible for service orchestration and describes input parameters like service name, ports, volumes, and environment variables, as well as dependencies between services, if they exist.
Coding the business logic
If you’re here, I assume you went through all previous steps successfully and all containers are running. This is the server site.
Now, we will focus on the business logic of our project—the client site. As I mentioned earlier, now we need to create the client script to communicate with the Spark server using REST API.
Before we start coding, I recommend creating a separate project where we put our code. Let’s call it livy_poc.
To play with the Livy server, we’ll use a Python library called pylivy. Of course, you can play with REST API directly using requests package but in my opinion pylivy will simplify our code a lot.
So, first, we have to install the required pylivy package like `pip install -U livy`.
It’s a common practice to create a virtual environment dedicated to a given project and install all required packages manually like above or using requirements.txt file `pip install -t requirements.txt`.
You can find helpful information on how to use venv here.
Now, we can create a file called titanic_data.py and put all logic there.
For simplicity, we’ll put all logic into one file, but in a real project it’s a good practice to split business logic into many files depending on the framework or project structure used.
In the client script, we have to import all required packages (livy and textwrap) to make our code mode friendly.
from livy import LivySession, SessionKind
import textwrap
In this example, we’ll play with the Titanic data set, which is very popular and free to use.
# Get and load Titanic data into Spark
get_titanic_data = textwrap.dedent(
"""
from pathlib import Path
import wget
data_file = Path("/opt/workspace/titanic.csv")
if not data_file.is_file():
url = "https://web.stanford.edu/class/archive/cs/cs109/cs109.1166/stuff/titanic.csv"
wget.download(url, "/opt/workspace/titanic.csv")
"""
)
As you can see, we embedded Python code inside a multiline string and assigned it to the Python variable get_titanic_data.
We can treat the code wrapped by multiline string as a query-script that will be submitted to our Spark cluster. Like SQL query in case of database.
Notice the imports inside our multiline string. This means that Spark has to import those packages before executing the rest of the code.
Now, we have to create a SparkSession object and load the previously downloaded data set into a Spark data frame.
Here you can find additional imports of SparkSession, SQLContext libs, on the Spark side.
load_to_spark = textwrap.dedent(
"""
from pyspark.sql import SparkSession, SQLContext
spark = SparkSession.\
builder.\
appName("pyspark-notebook-titanic").\
master("spark://spark-master:7077").\
config("spark.executor.memory", "512m").\
getOrCreate()
sql = SQLContext(spark)
data = sql.read.option("header", "true").option("inferSchema", "true").csv("/opt/workspace/titanic.csv")
print("---"*20)
print("Loaded rows:", data.count())
print("---"*20)
"""
)
Below you can see the logic assigned to variables that will be run against the Titanic data set on Spark cluster.
# Run some analysis
general_number_of_survived_passengers = textwrap.dedent(
"""
survived = data[data["Survived"] == 1]
survived_percent = survived.count()/data.count() * 100
print("Total number of passengers:", data.count())
print("Count of survived passengers:", survived.count())
print("Percent of survived passengers:", survived_percent)
"""
)
percent_of_survived_passengers_with_siblings_spouses = textwrap.dedent(
"""
sur_with_siblings = data[data["Siblings/Spouses Aboard"] != 0]
sur_with_siblings_percent = sur_with_siblings.count()/data.count() * 100
print("Count of passengers with siblings-spouses:", sur_with_siblings.count())
print("Percent of survived passengers with siblings-spouses", sur_with_siblings_percent)
"""
)
percent_of_survived_passengers_with_parent_children = textwrap.dedent(
"""
sur_with_parents = data[data["Parents/Children Aboard"] != 0]
sur_with_parents_percent = sur_with_parents.count()/data.count() * 100
print("Count of passengers with parents-children:", sur_with_parents.count())
print("Percent of survived passengers with parents-children", sur_with_parents_percent)
"""
)
some_aggregations = textwrap.dedent(
"""
grouped_passengers = data.groupby("pclass", "age", "survived").count() \
.orderBy(
data.Pclass,
data.Age.desc(),
data.Survived.asc()
)
print("---"*20)
print("Aggregated data:")
grouped_passengers.show(n=10)
print("---"*20)
"""
)
save_aggregations_as_parquet = textwrap.dedent(
"""
grouped_passengers.write \
.option("header", "true") \
.mode("overwrite") \
.parquet("/opt/workspace/titanic_grouped_passengers.parquet")
"""
)
What’s important here is that the source data frame called data is used and shared across all snippets. This means that we can create a variable or a data frame in one place and use it in any other place in our code inside one Spark session.
Now, it’s time to submit our business logic to the cluster. What exactly is happening here?
Inside the main function, we’ll connect to the Livy server and create the session object. Next, we’ll call the run method and use variables with business logic defined earlier.
# Execute pyspark code
LIVY_SERVER = "http://127.0.0.1:8998"
def main():
with LivySession.create(LIVY_SERVER, kind=SessionKind.PYSPARK) as session:
session.run(get_titanic_data)
session.run(load_to_spark)
session.run(general_number_of_survived_passengers)
session.run(percent_of_survived_passengers_with_siblings_spouses)
session.run(percent_of_survived_passengers_with_parent_children)
session.run(some_aggregations)
session.run(save_aggregations_as_parquet)
# Let's download data locally from Spark as Pandas data frame
grouped_passengers_1 = session.read("grouped_passengers")
print("Spark data frame 'grouped_passengers' as local Pandas data frame:")
print("grouped_passengers_1: ", grouped_passengers_1)
# Run same aggregation using SparkSQL
session.run("data.createOrReplaceTempView('titanic_data')")
session.run(textwrap.dedent(
"""
grouped_passengers_2 = sql.sql(
'''
select pclass, age, survived, count(*) as cnt
from titanic_data
group by pclass, age, survived
'''
)
"""
))
# Read the result from spark as Pandas data frame
grouped_passengers_2 = session.read("grouped_passengers_2")
print("Spark data frame 'grouped_passengers' as local Pandas data frame generated by SparkSQL:")
print("grouped_passengers_2: ", grouped_passengers_2)
# Compare local data frames
print("---"*20)
print("Results comparison of Spark MR vs SparkSQL")
print(f"len(grouped_passengers_1) ==", str(len(grouped_passengers_1)))
print(f"len(grouped_passengers_2) ==", str(len(grouped_passengers_2)))
print("---"*20)
print("Spark session closed.")
if __name__ == "__main__":
main()
As you can see, we used two different methods to execute our Spark code.
The run method is used to execute code; it returns an object with request status and text containing top ten rows.
However, if we want to use the data processed on our Spark cluster locally, we can use the read method that returns a Pandas data frame.
Additionally, Livy gives us the possibility to use SparkSQL (you can see how in our simple example). You can also use dedicated methods such as download_sql and read_sql.
Notably, in our example we’re creating a session object using a with clause so we don’t have to worry about closing Livy’s session at the end of the script.
Remember that after closing a Livy session, all data frames, variables, and objects will be permanently destroyed.
Cluster execution
If you’ve installed pylivy inside a virtual environment, it’s time to activate it by `source my_venv/bin/activate`. You can replace `source` by `.` (a dot).
To execute our sample code, first you have to start a Docker server on your machine. In the next step, using CLI, go to a project with Docker services configuration, in this case called livy_poc_docker. Then write the `docker-compose start` command and press Enter.
After one or two minutes, when all services are running using CLI, go to the project with our business login—in our case called livy_poc.
Inside our project, write `python tytanic_data.py` and as the output you should see something like this:
------------------------------------------------------------
Loaded rows: 887
------------------------------------------------------------
Total number of passengers: 887
Count of survived passengers: 342
Percent of survived passengers: 38.55693348365276
Count of passengers with siblings-spouses: 283
Percent of survived passengers with siblings-spouses 31.905298759864714
Count of passengers with parents-children: 213
Percent of survived passengers with parents-children 24.01352874859076
------------------------------------------------------------
Aggregated data:
+------+----+--------+-----+
|pclass| age|survived|count|
+------+----+--------+-----+
| 1|80.0| 1| 1|
| 1|71.0| 0| 2|
| 1|70.0| 0| 1|
| 1|65.0| 0| 2|
| 1|64.0| 0| 3|
| 1|63.0| 1| 1|
| 1|62.0| 0| 2|
| 1|62.0| 1| 1|
| 1|61.0| 0| 2|
| 1|60.0| 0| 2|
+------+----+--------+-----+
only showing top 10 rows
------------------------------------------------------------
Spark data frame 'grouped_passengers' as local Pandas data frame:
grouped_passengers_1: pclass age survived count
0 1 80.00 1 1
1 1 71.00 0 2
2 1 70.00 0 1
3 1 65.00 0 2
4 1 64.00 0 3
.. ... ... ... ...
277 3 2.00 1 2
278 3 1.00 0 2
279 3 1.00 1 3
280 3 0.75 1 2
281 3 0.42 1 1
[282 rows x 4 columns]
Spark data frame 'grouped_passengers' as local Pandas data frame generated by SparkSQL:
grouped_passengers_2: pclass age survived cnt
0 2 13.0 1 1
1 1 58.0 0 2
2 3 28.5 0 2
3 1 23.0 1 3
4 1 32.0 1 2
.. ... ... ... ...
277 3 22.0 1 9
278 2 21.0 0 5
279 2 33.0 1 2
280 3 20.0 1 4
281 1 60.0 1 2
[282 rows x 4 columns]
------------------------------------------------------------
Results comparison of Spark MR vs SparkSQL
len(grouped_passengers_1) == 282
len(grouped_passengers_2) == 282
------------------------------------------------------------
Spark session closed.
Status monitoring in Apache Livy, Apache Spark, and JupyterLab
Finally, we’ve got everything up and running. But how can we monitor service status? Below you’ll find some tips.
Apache Livy session monitoring
If you have any sessions running, you’ll see the list of started sessions and their status.


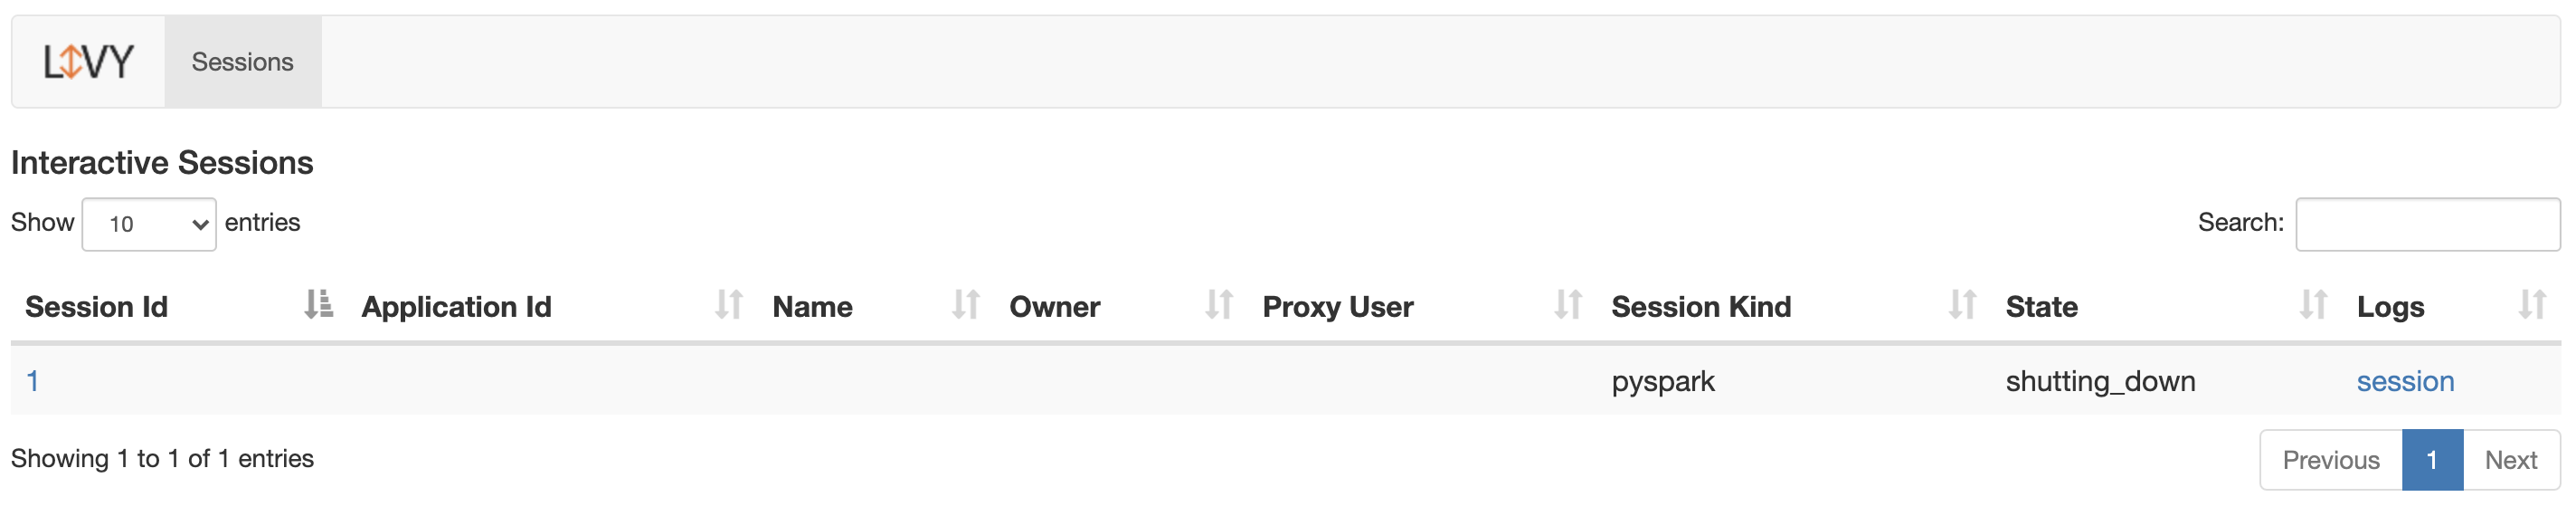
You can click on the session number to see the details, such as executed code, status, and progress.
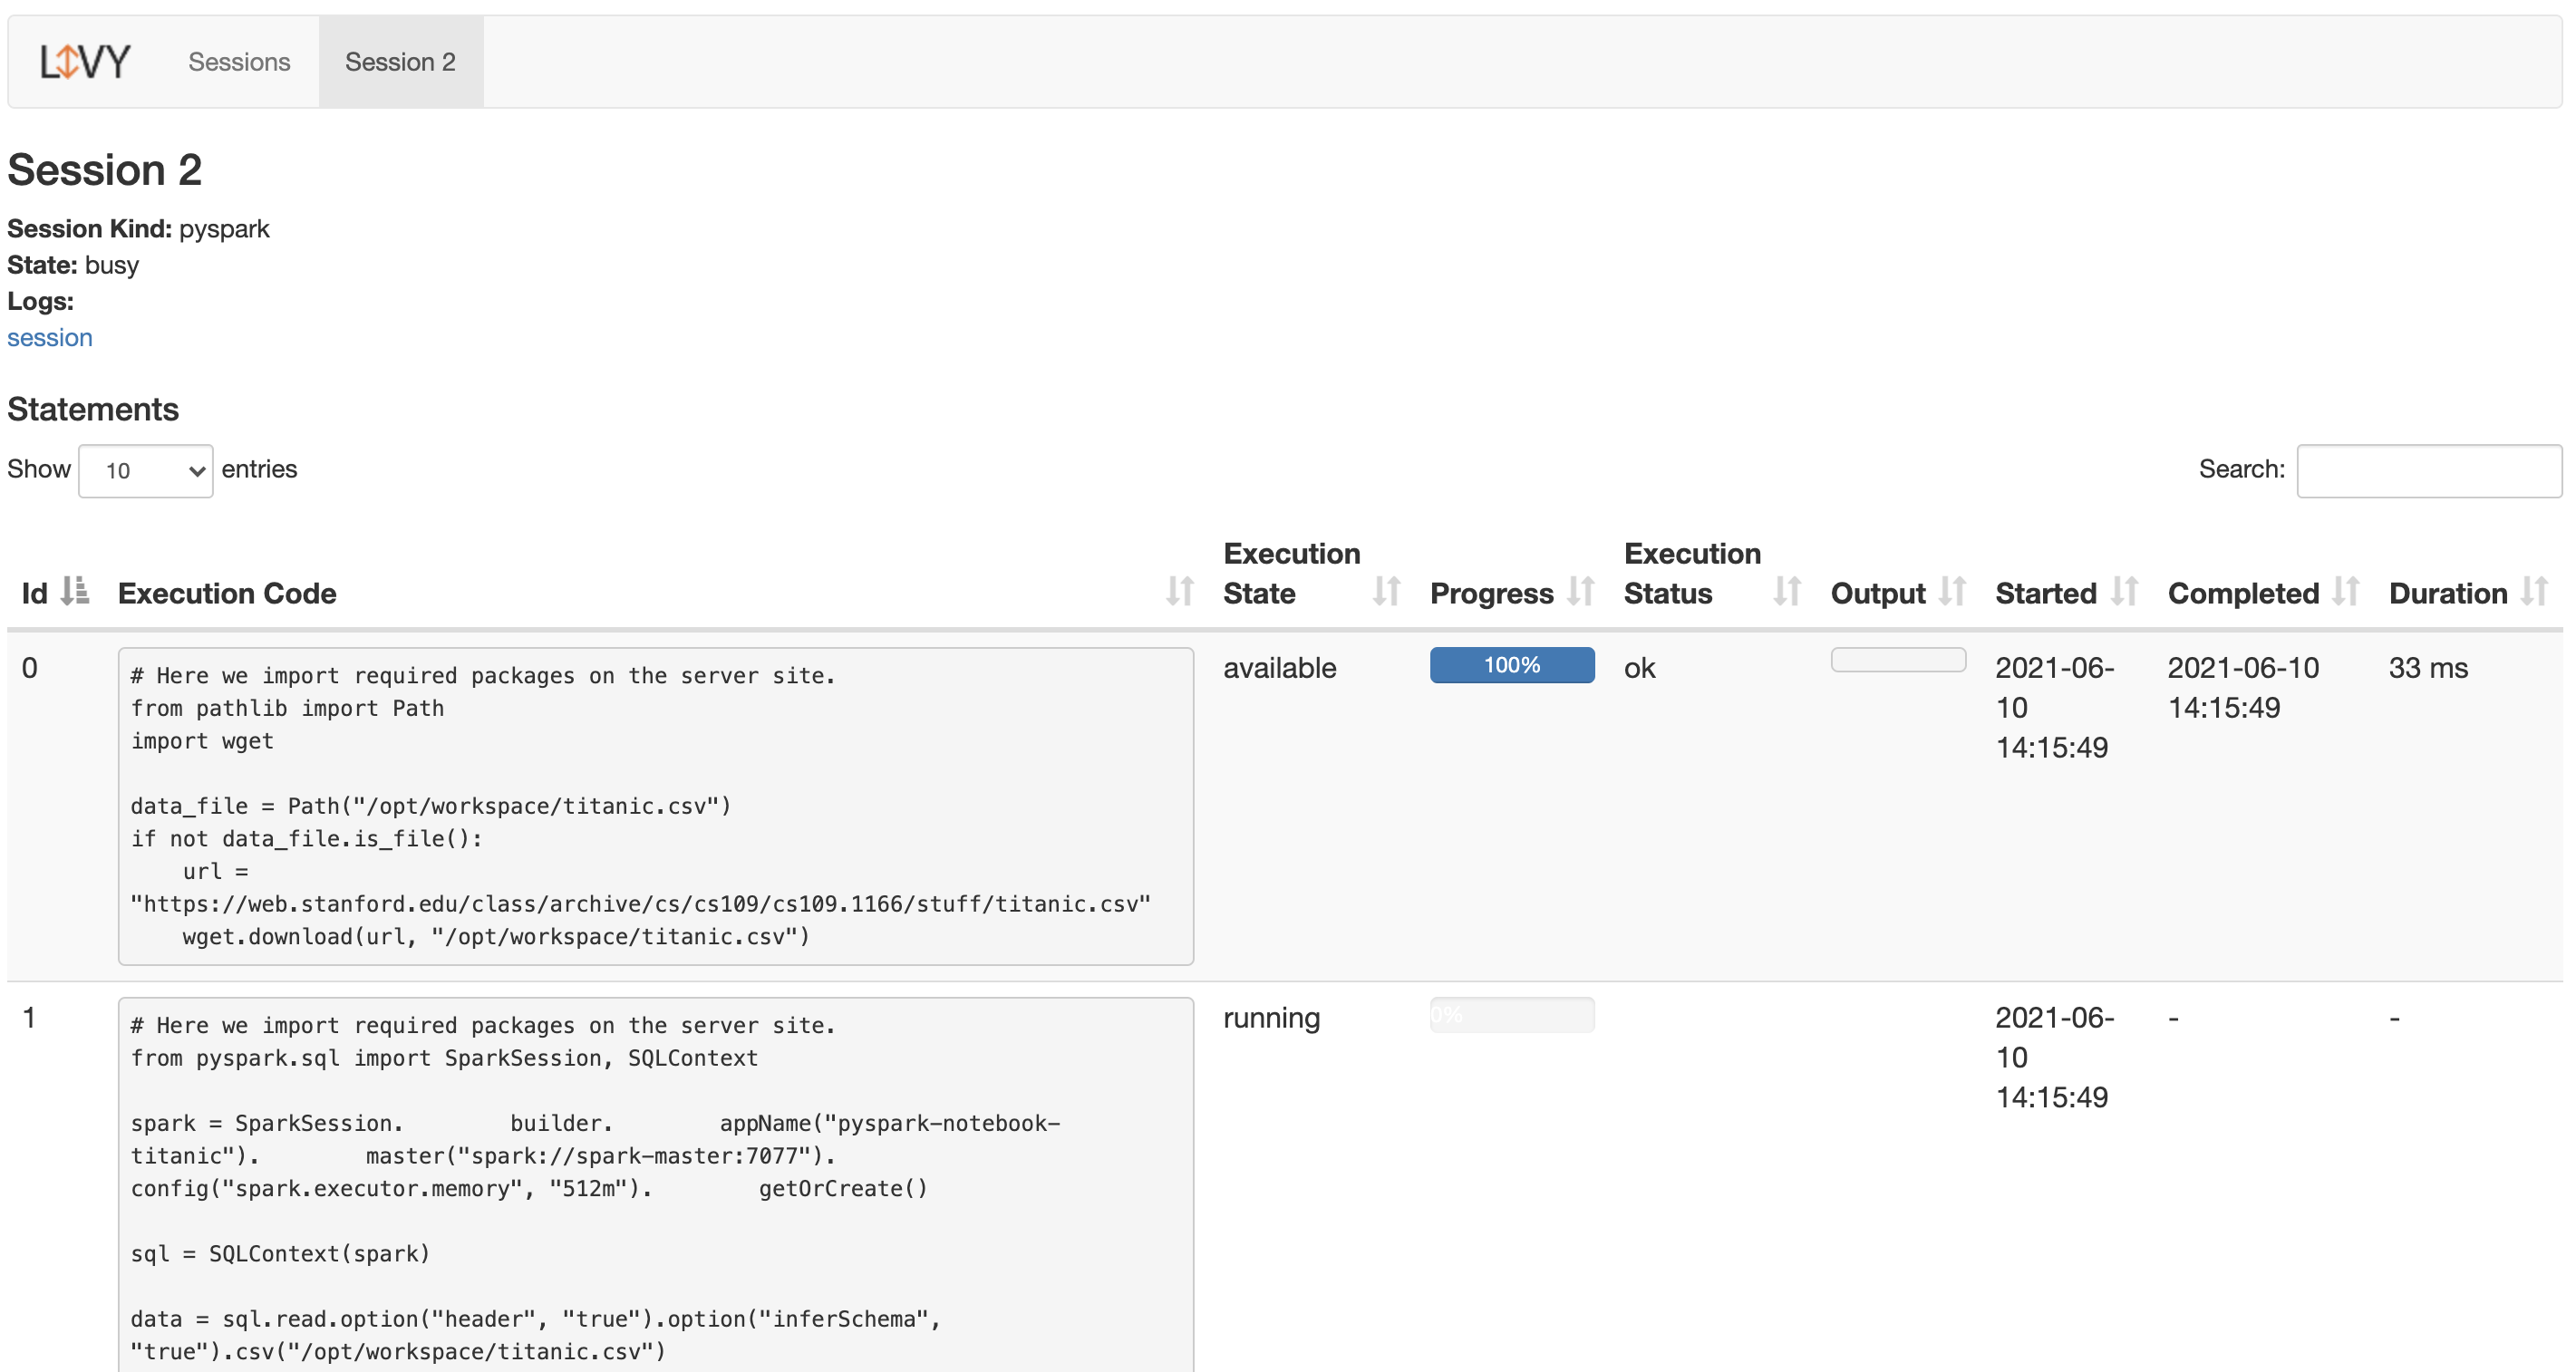
If you click on a session in the logs column to see all session’s logs, here’s what you will see:

And if there isn’t any session running, you’ll see this:

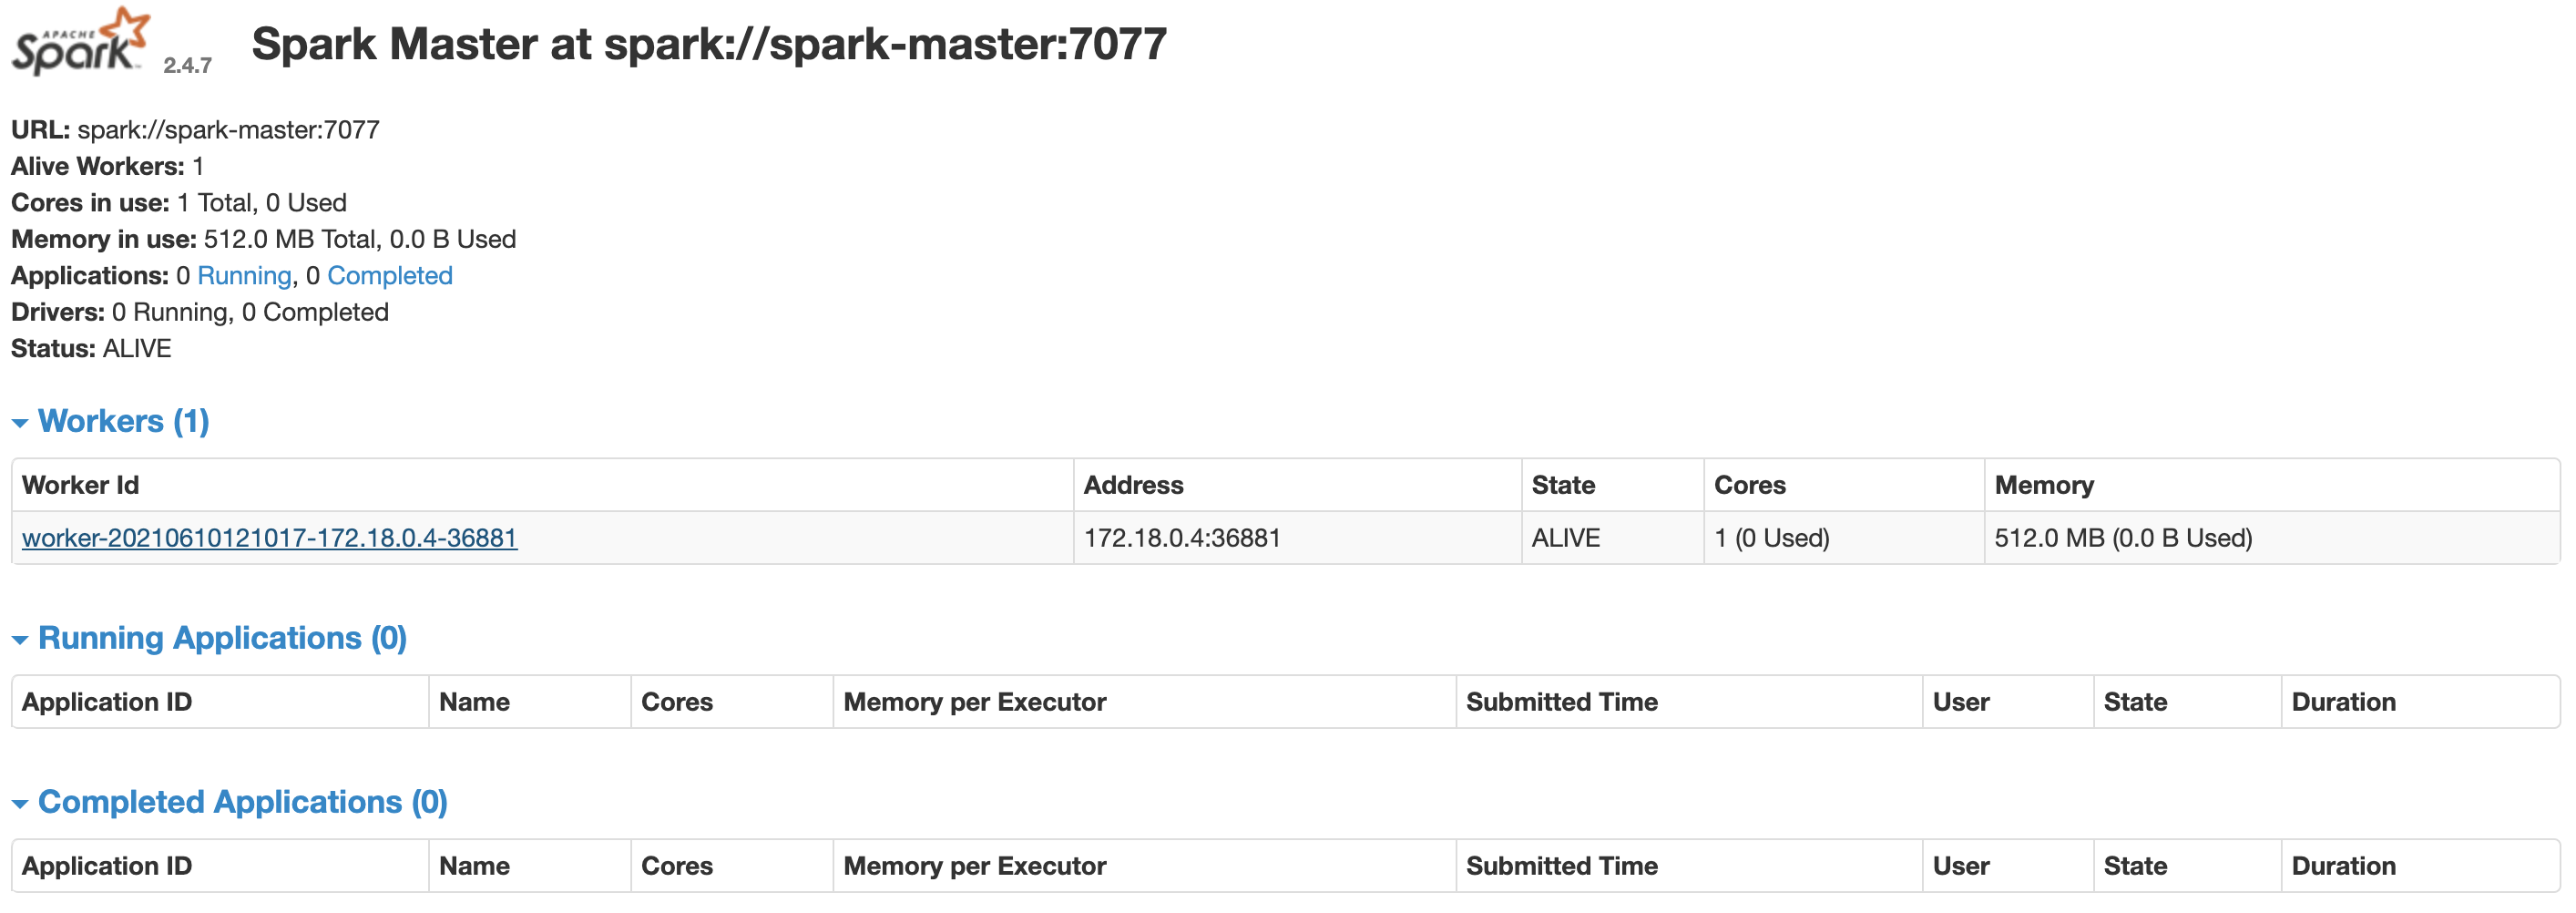
Apache Spark cluster monitoring
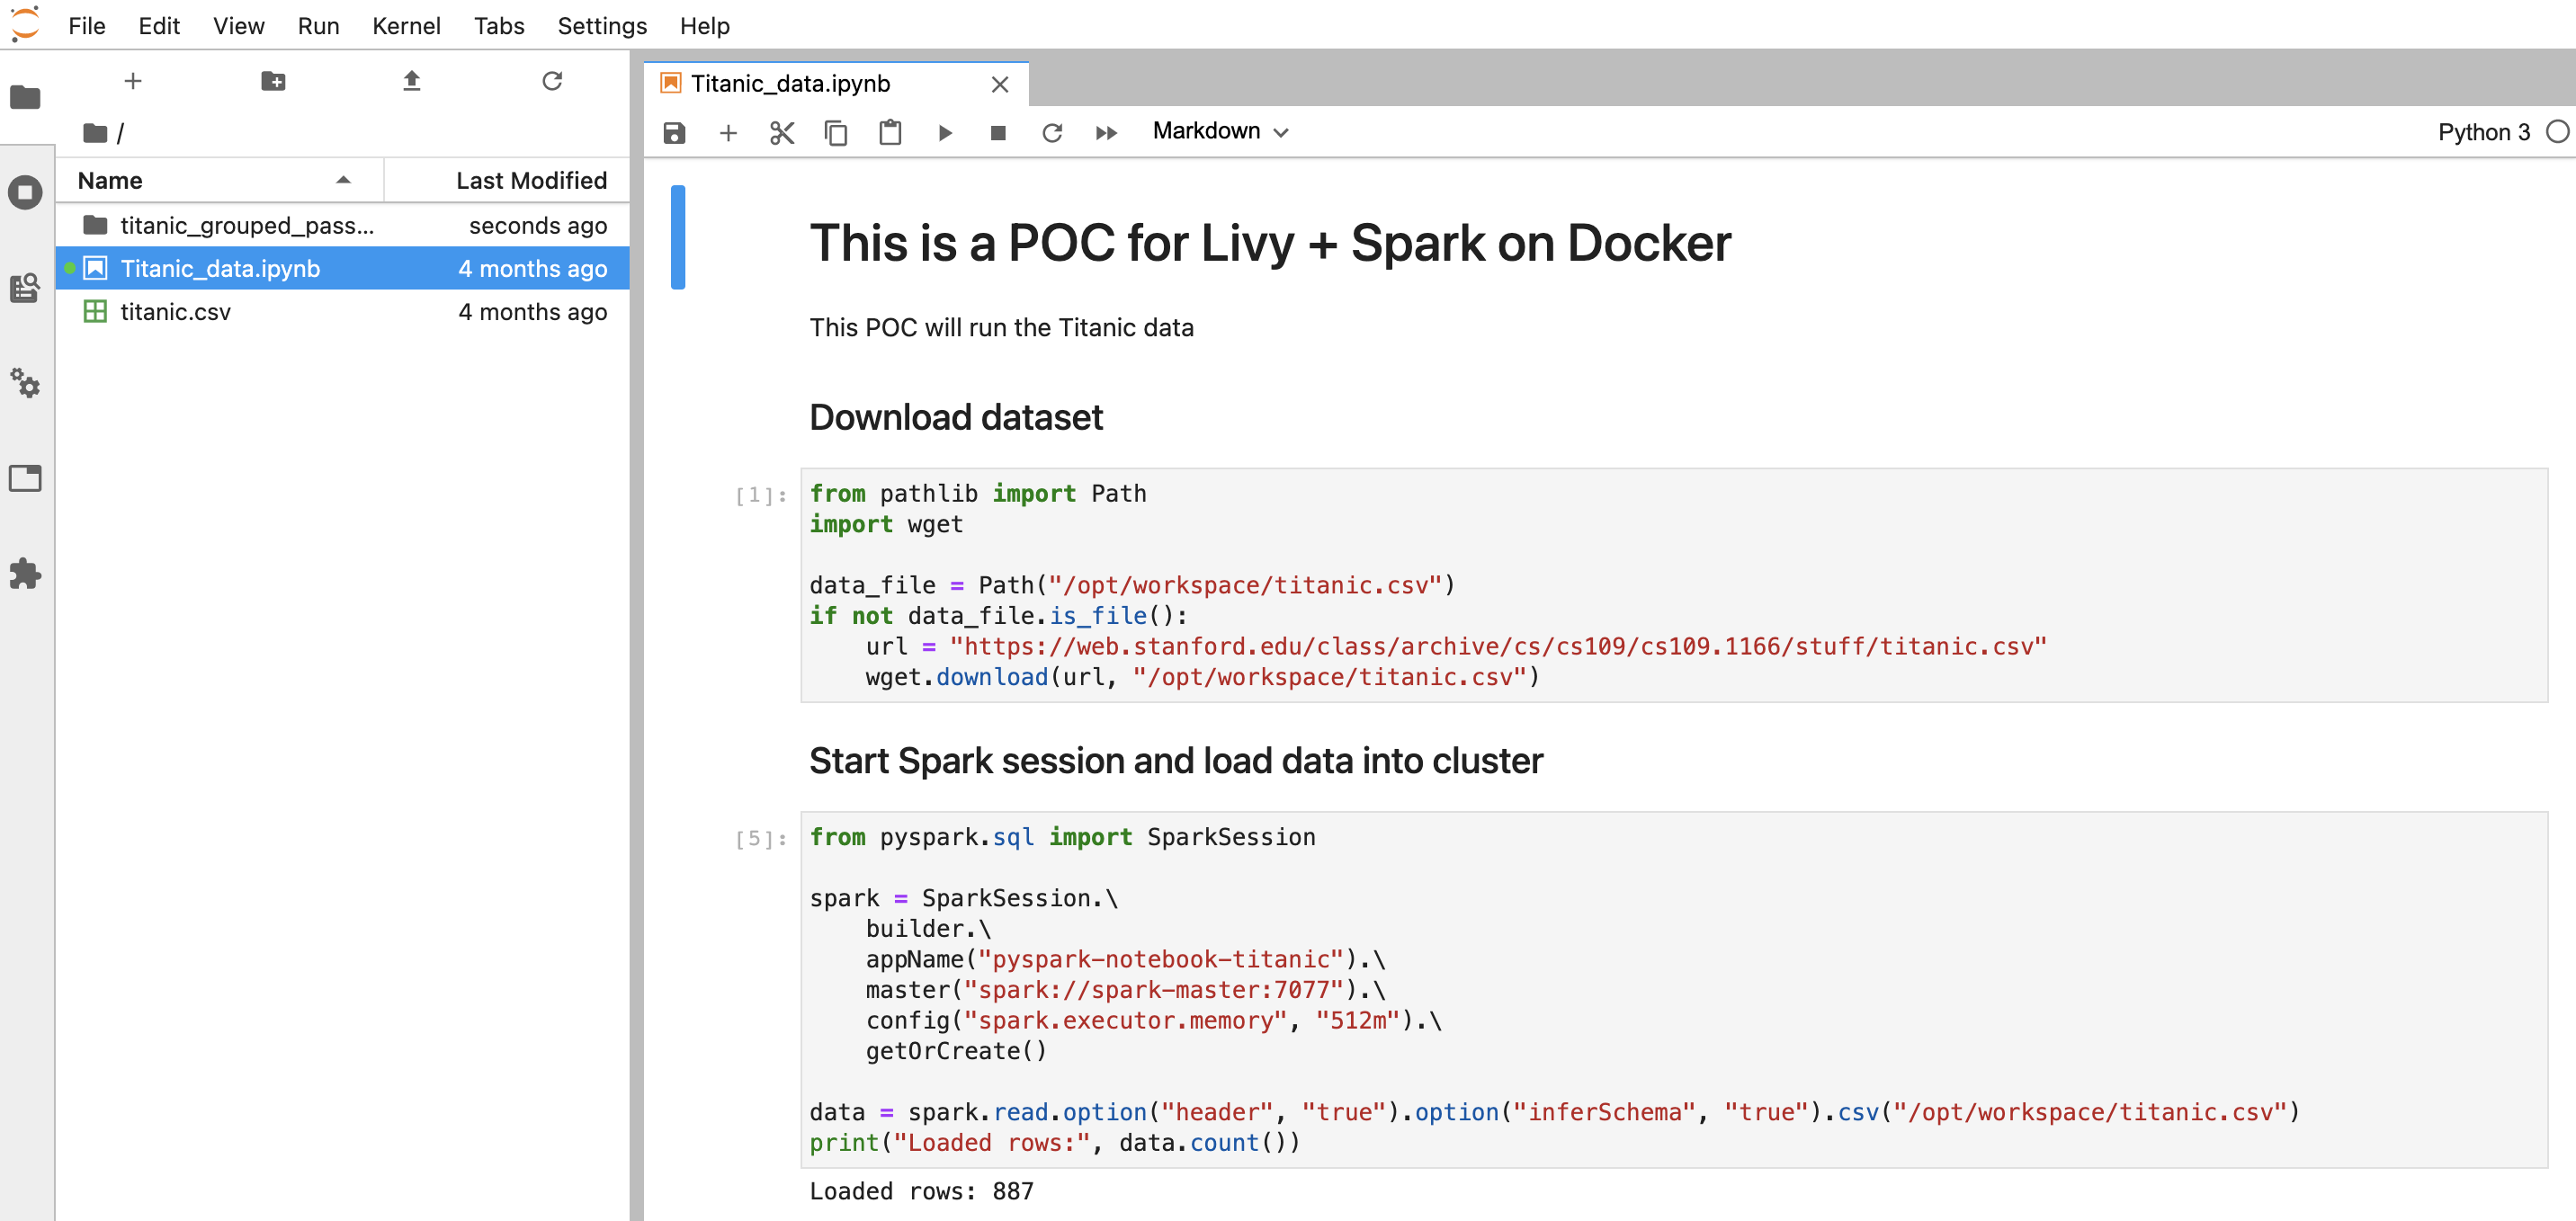
Developing with JupyterLab
Now, it’s time to explain why I’ve created the JupyterLab service. To be honest with you, I really like this setup because it gives me the possibility to use the JupyterLab environment to develop and test my Spark scripts. When it’s ready, I can automate them using Livy API without any other configuration.
So this is how I’ve developed the business logic of the example presented in this article.
Final thoughts on the Apache Livy REST API
In this article, we’ve covered how to use Apache Livy with Spark and what benefits Livy can bring to your work. I’ve also explained how to integrate it with a Python project and prepare a simple project based on the Docker environment, which makes this project system-agnostic.
Even though it might look like a lot to take in, remember that what I’ve shown you is only the tip of the iceberg. Livy can do much more, especially if you use pylivy as an abstraction layer. This will give you a powerful tool to create and manage your Spark jobs from your application or to create more flexible data pipelines.
If you decide to use Apache Livy in your next project, it will be beneficial for you to make yourself familiar with the pylivy documentation first. In there, you will find many helpful classes and methods that make using Livy very efficient and simple.
As Europe’s Python Powerhouse, we have plenty of other technical guides like this one to offer you. We can also meet any software development needs you may have. All you have to do is reach out to us and we’ll gladly see if there’s something we can do for you!
Additional resources and further reading
Docker
Apache Livy
- https://livy.apache.org/
- https://livy.apache.org/docs/latest/rest-api.html
- https://livy.incubator.apache.org/examples/
PyLivy
Apache Spark
JupyterLab


